-
Make your own blocs
Blackvoxel offer it's own form of super creative mode. Making your own textures and use it in blackvoxel is easy as to say it !
(1) Download the texture graphic template files.
(2) Modify it with Gimp (or other image editing program).(3) Find your blackvoxel user texture directory.
(4) Export it in bmp A8R8G8B8 format.
(5) Run blackvoxel and use the UserTexture tool to convert regular blocs into you own materials.
(6) Use your own materials as you wish.(7) Go further and create transparent materials.
All these operations are detailled below.
(1) Download the texture graphic template files
Two version of the file are availlables :
- XCF gimp native format version with layers : Download Here
- Raw bmp you can test directly in blackvoxel and modify with non-gimp image editing tools : Download here.
(2) Modify it with Gimp (or other image editing program).
- Load template file in Gimp.
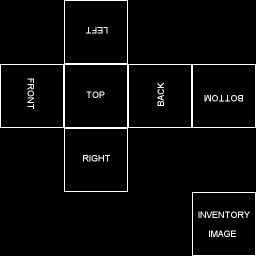
- Paint your texture in the 6 faces of the cube. Don't forget to rotate each face in the good direction. Look at the text direction in the template and set your face accordingly. It's better to run over the line for 1 pixel or the the background to the texture border color because sample filtering can use additional texels in border pixels.
- Set the inventory image texture. It's unused yet. But it is planed to be used in the future for inventory image.
(3) Find your blackvoxel user texture directory.
Custom user textures are stored in this directory.
The directory location may vary because user data storage are operating system dependant.
Important : You must launch Blackvoxel game at last once to create the game profile directory.
Linux:
- Open your file explorer
- In your home directory, find a directory named "Blackvoxel".
- In the Blackvoxel directory, you will find the user texture directory named "UserTextures". That's where you must put user textures.
Windows :
(Work in progress)
(It's in your user application data in the roaming section).(4) Export it in bmp A8R8G8B8 format.
- In Gimp, go in the "File" menu and click on the "Export As a copy..." entry.
- Go in the UserTextures directory (see above) and use the filename "voxeltexture_1.bmp". If you have several texture, change the number to "2", "3", etc. Texture numbers must start with "1" and be consecutive without interruption.
Important : If you don't find the .blackvoxel directory, you sytem file explorer may have hidden file display disabled. You can save your file elsewhere and copy it in the right directory with the file explorer after enabling hiddent file display. - Choose "advanced options" in the option box and select A8R8G8B8 format. If it is disabled and can't be choosed, cancel export and redo it after flattening image and creating an alpha chanel (Layer Menu->Transparency->Create and alpha chanel).
- Click on save
(5) Run blackvoxel and use the UserTexture tool to convert regular blocs into you own materials.
When you start a new game, you will find the User texture converter tool in your inventory. With it, you can convert regular blocks into your customised block type.
- Grab some common blocks if any type.
- Select the UserTexture Tool in your selector bar with the scroll wheel of your mouse.
- Put it in the ground by clicking in the left mouse button.
- Use the UserTexture tool by pointing it with the reticle and clicking with middle button (push on the scroll wheel).
- In the UserTexture Tool dialog, drag and drop the blocks you want to convert in the working zone.
- Use the button in the higher area to choose wich customised texture you want to apply.
- Click "Get It" Button
- Drag and drop back the converted items into your inventory.
(6) Use your own materials as you wish.
- Select the new customized block type from your inventory by rotating the mouse scroll wheel.
- Left click to place the block where you want to.
(7) Go further and create nice transparent materials.
Transparent materials may be created and used in blackvoxel. You can create all types of glasses with textures and colors to create beautiful transparency blending effects.
Create materials in gimp with transparency and export them.
As all texture are exported with alpha chanel, you can export them from Gimp like regular opaque textures.
That said, there are extra step you must take with Blackvoxel for transparency to be rendered correctly : you must inform Blackvoxel to render theses textures as transparent textures with a special rendering process.To achieve this, do these extra steps :
- In your user texture directory, create a new directory named "voxelinfo"
- Go into this directory and create a text file with a text editor with the name "voxelinfo_x.txt" (replace x with the number of the texture file).
- In this file copy these fields :
VoxelTypeName=The name of my texture
Draw_TransparentRendering=1
Draw_FullVoxelOpacity=0
- Save file and run blackvoxel.
Do not forget your texture must have suffisant transparency level to blend correctly with other transparent textures. If you use opaque zones with transparent rendering mode, you can have unpredicted results when transparent blocks will blends.
-
Make your own blocs